Posts Tagged ‘wandering strip piecing’

Freehand Or Improvisational Piecing – The Basics

Sunday, July 26th, 2015


detail, Ebb and Flow 2

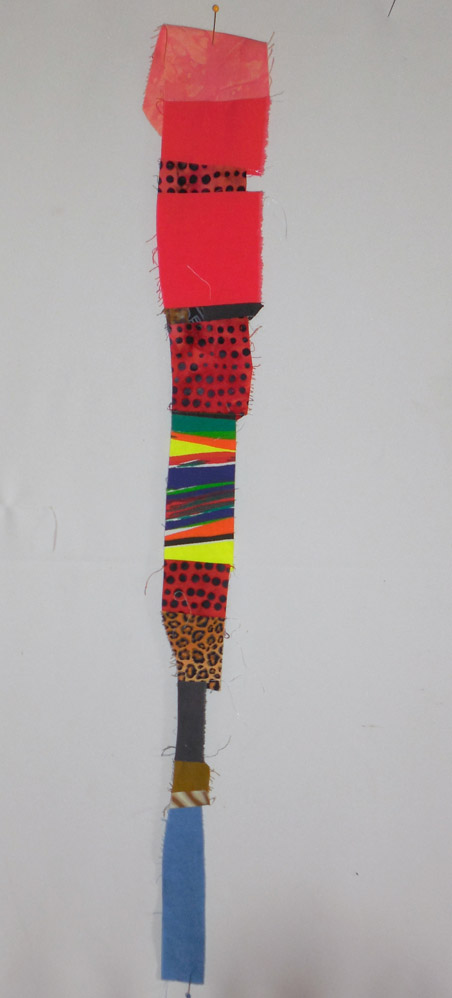
I’m quite often asked how to go about improvisational or freehand (template free) cutting and piecing which has become very widespread  among quilt makers in the past 25 years- a modern tradition really.  Widely used by art quilt makers who piece their designs, and seen in quite a number of Modern Quilts, it’s all rotary cut and machine pieced.   The following basic instructions contain all you need to know to begin, as I only learned it from watching a short demonstration by Nancy Crow at the start of a several day long workshop, and then plunging in to using it straight away. It enabled us to rapidly get through heaps of exercises in her class on design and colour.  I’ve been enjoying this way of piecing ever since.

basics of improv


Hand piecers could use this just once,  perhaps, to make some wayy lines in the one direction  but it really is a machine technique,  even if you’re pretty speedy, as hand sewing won’t allow for more complex cutting, re-arranging, inserting slivers and so on.

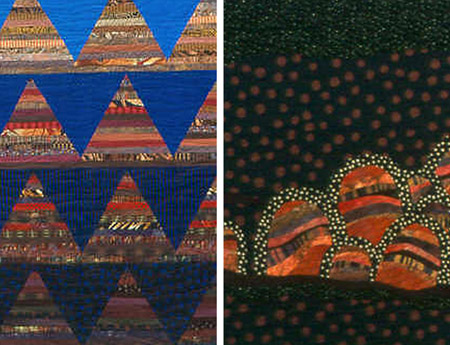
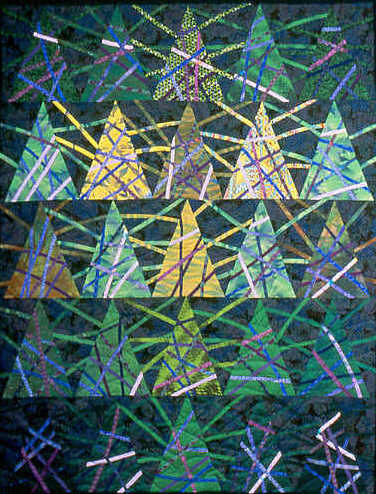
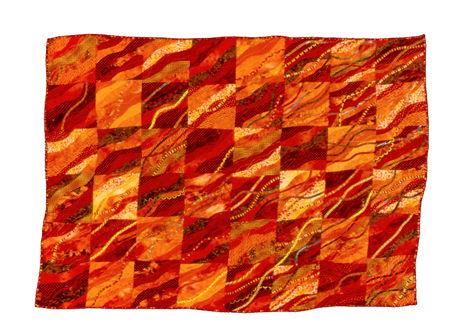
Freehand or ‘improvisational piecing’ has become a modern convention – and once you recognize it, you’ll see it wherever there are pieced art and non-traditional quilts.   Elsewhere on this website are two galleries of my original quilts made between about 1990 and the present –  the Color Memories gallery followed chronologically by the Ebb& Flow gallery.  Keep in mind that have been piecing this way for over 20 years, but I too began with these simple instructions way back then.   With practice, you too will be able to achieve more complex constructions if you wish.

Basics of improv blog image

The main things to remember are:

  • to place both fabrics right side up
  • without built-in seam allowances, as you cut and sew each fabric shape its area showing on front becomes progressively smaller – so start out larger in anticipation. Experience will tell you how much to allow, but, if you run short somewhere on a side you can always add another piece as quilters traditionally have !
  • in addition to getting smaller, so, too, the edges become progressively more irregular. Resist your trimming urges until you have finished ALL the piecing.   When you do get round to trimming, discard tiny pieces but keep anything useful – small bits also piece up into lovely freeform mosaics you could use for appliqued or printed designs – see Judith Trager’s work among others for some good examples.

Alicia Merrett ‘s YouTube videos, are good in a very precise, controlled way –but, they were pitched to careful traditional quilters, but even so, you might find them helpful.    In the Nancy Crow class where I learned this piecing, we had a lot of colour and design work to get through in the time, and Nancy showed us these basics that enabled rapid working.  We put all rulers away and did no pinning, just putting edge to edge and sewed.  Some managed this better than others in the workshop; and at home I found my own way of working which includes periodic dots along the cut edges with permanent marker or other pen/pencil/chalk – and even more of these in tight curves.    I usually pin every few inches, more in tight curves –  but it all depends…. there are no right ways to do this, and only one correct result – a flat one.  Once you have learned the basics, experience will teach you whatever you want to know next – think it, try it.  And, if you ever need my advice or help, feel free to contact me through this website.


There’s Nothing Like a Bit of Scrap Bag Diving!

Sunday, May 24th, 2015

I keep a large bag of small scraps., principally offcuts from projects.  When I’m clearing up after finishing something, anything worth keeping goes into the large clear plastic bag on the floor beside my sewing table.  The bag being clear helps, just a little, when I’m looking for something in particular, as I was this morning.  I needed more earthy colours to add more shapes to the current Bungle Bungles piece I’m working on, you may remember.

earthy colours

Relatively speaking, piecing like this uses as much fabric in seams as shows on the front.  When I’m doing pieced work, I use a large variety of different fabrics in small amounts; and nothing is cut out in advance, its all cut freehand and sewn seam by seam in the technique known as ‘improvisational piecing’. The Ebb&Flow quilts in particular are assembled in this way with a lot of scrap bag diving along the way –

SCRAP BAG  Ebbs and Flows


Needing more of some fabrics including some of those little one-offs that add spice, I took a deep breath and began scrap bag diving – well, turned it all out on my table, and started sorting though, selecting things I can use, and putting most of it back into the bag.

SCRAP BAG archeology

SCRAP BAG  save all yellows

I carefully save all offcuts of every yellow, partly because although I rarely buy any yellow fabric, a touch of a yellow value here and there in every piece of art, whatever the medium, is vital, literally giving life to the work. The more valuable the fabric/colour, the smaller amount I am prepared to save…. and the smallest piece of a strong almost acid yellow I came across this morning was barely 3cm x 1cm!

SCRAP BAG  save yellow

This piece of yellow with airbrushed red and blue is gradually running out – so its very precious. I have about  3cm x 4cm left of a fat 1/4 bought years ago from Deb Lunn in Denver.


SCRAP BAG good grief

This morning I realised scrap  bag diving is rather like archeology, digging down though the past – and like archeology, it throws up some puzzles, of which this is one!  I don’t remember putting it together, but these are definitely my fabrics, and all sewn together by me, for sure – but why?  I certainly don’t remember anything in which this sequence appeared.  It’s a nice yellow in that striped print, though….


SCRAP BAG elegant snippets

I really don’t remember the work these offcuts came from – they were trimmed off after the gold stitching along each place the cream meets the print…. quite elegant, really, and I may do something more in these gentle neutrals soon. With gold stitching/quilting.


SCRAP BAG extra units CynthiaSCRAP BAG raided block

I often work in repeat units – and always make a few extra to get the best possible result when juggling them at the assembly stage. From ‘Cynthia’s Quilt’ top, and ‘New Directions’ below, come these ‘spares’ which have useful sized pieces – and the raiding has already begun on the lower ‘block’.  The fabric in that block terminating in the triangle/arrow head is destined for salvaging for use in the next set of strip assemblies I need to put together; I only ever had a small amount of it and I’m down to last few square centimetres…


SCRAP BAG one glove

And finally, much to my delight, virtually at the bottom of the heap, I found one of the pressure gloves I’ve been missing for a while, since last spring really….so then I had to tip it all out again and go through more carefully to find the other.   And sure enough, it was there.  The weather’s getting cool again, and some days now my hands are feeling a bit in need of pressure on the arthritic joints – so this find was timely and welcome!.

The Bungle Bungles of Australia’s Kimberley

Monday, March 9th, 2015

Known as “Purnululu” to the indigenous people of the region, and later known by Europeans as  “The Bungle Bungles”, these ancient landforms are located in a remote region of Australia’s north west known as The Kimberley.    It’s hard to get to, distances are long and rugged travelling, and though very expensive, flying over it is a very popular way for some to experience it.  I haven’t been there yet though I have travelled over a lot of the Kimberley region, including all the towns mentioned on this location map.

The Kimberley map

The Bungle Bungles have long been depicted in Aboriginal art from the area, and the formation has become a familiar motif in collectable art  in formats ranging  from paintings to Tshirts, graphic logos and 3d sculptures.

I’ve been inspired myself.   Back in 1993 I finished a quilt called Nightfall In The Bungle Bungles  155cm x 148cm part of which is shown here on the left. When finishing off this quilt, I went to a workshop by Nancy Crow at which I learned the basics of improvisational piecing which changed the whole way I piece fabric.  If I’d left making  NITBB until a month later, it would not have looked like a row of Egyptian pyramids 😉

BBungles Kimberley 2 collage blog The idea stayed with me and in 2002 I had another go, and the result, above right, was Kimberley 2, 70cm x 110cm.  


Wherever you go in this area it is impossible not be be impressed with distance, remoteness and dramatic scenery including waterfalls gracefully falling over over towering cliffs into the clear refreshing pools at their base.  Such cliffs inspired Kimberley 2, 1996,  110cm h x  70cm w, an irregular shaped peice photographed against a black background.

kimblerley


This morning I came across a call for entries for a textile art competition to be called ‘Kimberley Dreaming’ to be shown in Australia later in the year.  The required format is 30cm x 30cm.  I have some ideas gelling and enough time to put one or two into effect before the closing deadline – so I’m off to dig through my scrap bag for suitable fabrics to begin putting something together.


Fine Strips In Pieced Quilt Designs

Monday, January 19th, 2015

Kathy Loomis’ blog today referred a reader to her 2010 tutorial on piecing very narrow lines into a background fabric, which for some time have been a feature of her work.  She’s not the only one who pieces narrow at times – Lisa Call , Margery Goodall and Alicia Merrett  are among other well known quilt artists who produce great effects with very narrow lines pieced in.   I know Margery well but have never watched her doing her machine piecing;  Kathy described her process in that post; and I have no accurate knowledge of the steps Lisa and Alicia use or in which order, but I would say that they all do the cutting and piecing in different order, and perhaps even with different equipment, as none of their works look like the other – and nor do they look like mine, either!

When I first started to insert strips years ago, I worked out how to get them VERY even, parallel, usually about 1/2″ showing on front, but worked down to narrower strips after a time, as in “Strip Lighting”  1990 – the strips range from  1″, 3/4″ , 1/2″to 1/4″

Strip Lighting


Ora Banda 1992 (below L) and Window Onto Bougainville Street 1992 (below R)  are early examples, and you can find full views of these two in my  Colour Memories gallery on this website.  With straight cuts into the background fabric, strips cut exactly parallel, and carefully followed seam allowances, the result is predictable, and was pleasing at the time.

Bougainville St and Ora Banda collage blog

I eventually worked out how to avoid the dreaded bias cuts AND achieve a fair bit of curve using straight cuts from selvedge to selvedge, and it doesn’t even matter if the lines are a little uneven !!    Why? Because, as long as there’s enough seam allowance,  the main secret is that for the second seam I turn the work over and sew that line from the other side, that is, with the strip lying on the sewing table, beneath the background fabric.   

In 1991 I discovered that even straight strips will curve very nicely with proper handling, a learning process that began while making  ‘Lilydale’.  I was in hurry to meet a self imposed deadline, and had trouble with some cuts that came out unexpectedly a bit off, but some of those fabrics were fat 1/4’s of which there wasn’t any more to piece in – so with necessity being the mother of invention, I learned how to manage slightly curved inserts! 

Lilydale

Eventually I  incorporated more pronounced curves with strips, with a good example being Bushfire 4 (2004)  but there are  many more in the Colour Memories gallery. The strips in each are all cut selvedge to selvedge, really, there are no bias strips; and my piecing is as good and flat as anyone’s, anywhere.  These strips were cut about 3/4″ and appear on the front as something less than 1/2″.

Bushfire 4 adjusted blog copy

To make straight strips combine with curves, though, needs a workshop with hands on demo, and plenty of practice –  is is a little more complicated, but it’s not hard.     It took me a while to work out how far I could push the degree of curviness, but ask me to teach in your area and I’ll come and show you what I learned!

………………………………….

2003 marked a new phase of inserts – with an organic look, often very skinny, too; but its still the same that once you get to sew – the sew-the-second-seam-from- the-back-thing still applies. This is ‘Lightstream’

Lightstream copy blog

and it led to the group of quilts I now label the Ebb & Flow quilts – gallery on  this website with plenty of examples.


Experimenting and Learning Through Projects And Collaborations

Saturday, December 6th, 2014

On the Quiltart list this morning a member described a group project which in truth is better termed a collaboration.  Whatever you call it though – this project required identification of common goals and comittment to achieving them through a group-made art quilt.  What was missing from the post is any analysis of  how the idea came up, how the group came to decide to carry it out, and why – what the expectations of the group were to start with.  Clearly some dropped out because of technical challenges faced, and others didn’t drop out because of  loyalties they felt to the group.  Deeper examination before hand, though, might have meant the project didn’t happen at all and at least some of the group may not have learned what they did in the process.

Some of the real problems such projects can present are described in April’s words:  “We all learned quite a bit along the way as this piece was way outside the comfort zone of all of us. I think that the piece will be quite amazing when it is completed, but it has been quite a struggle seeing it to fruition. Some people dropped out as soon as things became difficult and challenging; and others stuck with it even though they had no real interest in the project, but they were reluctant to abandon the group. It has been an interesting example of group dynamics to say the least. But it doesn’t really matter, as we are all still close friends.”   You can visit the   April Sproule  post  to find out more about their project, and see pics of how it developed technically.   

In my early art quilt making days I belonged to a small SE Denver group we called “Quilt Explorations”, which we formed to explore non-traditional quiltmaking, and we focused on design in particular.  We often set ‘themes’ for monthly individual exploration, and participation was optional, so the results were truly individual, and varied depending on each person’s interest and drive, time available, etc. The most successful theme, where everyone was enthused to produce something, was based on the b/w picture of the front end of a gorgeous vintage car given to each of us by the member who suggested the exercise..  We each took some element from that photo on which to at least design a small quilt, even if  time was too short  to actually make it.  Everyone came back a month later with at least the design, most had started and some had completed a small quilt.  After 2 months we had a collection of  about 10 finished quilts.  At the next group exhibition these were all hung together to show the diversity of results  when people work from exactly the same initial image.  I don’t still have that photo, but found this image of the kind of pic we all received:vintage car - strip lighting 2 blog


In about 1991-2 I was in love with inserted straight strips, having not yet heard of life-transforming freehand or improvisational piecing which prompted the technical experiments to achieve the curvy inset strips characteristic of my 1992+ Colour Memories quilts.  With strips on my mind ,the headlights of the car caught my attention.  I produced this small wall quilt about  50cm sq.  I called ‘Strip Lighting’


Strip Lighting


We never did a group collaboration – I doubt anyone would have suggested it as were were all clearly set along our own paths when the group came together,  and such a project would have felt a diversion of dubious value from our individual goals. I have never been drawn to a collaborative project to produce a work / works of art, and maybe will explore this in a later post…. and perhaps I need to do some self examination on the matter first!


Entries (RSS) and Comments (RSS).

All images and text are © Alison Schwabe
Reproduction of any kind is expressly prohibited without written consent.

Translate »