Archive for the ‘General’ Category

Lines- Seams Waiting To Happen

Tuesday, March 22nd, 2016

I’ve previously blogged about my approach to planning  https://www.alisonschwabe.com/weblog/?p=1010  and in that particular post used a collage of diagrams on pages from it:

Collaged sketch book pages

One was a snippet from a diagrammatic sketch of a man wearing heavy outdoor clothing featuring a fisherman’s rib neck on his sweater.  I saw it in some ad in an Aussie newspaper back in about 1995, and clearly remember it but can’t find the actual pic.  It inspired me to sketch the pattern of knitting and the use those lines and shapes in a commissioned quilt for a book “Quiltskills” 1997, published by the Quilters Guild of NSW.  Each chapter featured particular skills useful to contemporary quiltmakers, illustrated by a quilt made especially to go with the article.  Mine was chapter 2, Irregular Shapes.

Anyway this morning I found a very old and poor image of that quilt, Waterweave”,  the colour of which somehow seems stuck at ‘too green’ but anyway I’ve put it alongside that line diagram to show how for me a basic diagram can lead to an actual quilt.  Its typical of my planning that I work things out as I go, and usually know when its time to stop.

Waterweave quilt and sketch blog


As a student and then teacher of geography, illustrating whatever I’m talking about with a simple diagram is what I naturally turn to, so my designs in fabric and thread tend to develop from that kind of mark making, too, and I’ve mentioned before that I see almost any line as a seam waiting to happen.

Using Leftovers, Scraps

Saturday, March 19th, 2016

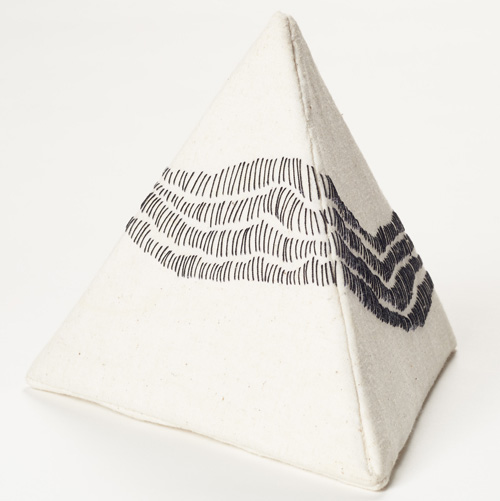
This week, my photographer here in Montevideo, Eduardo Baldizan  took pics of a number of my tetrahedron shapes.  This one is called “Rainbow”, and like all in this series so far, is 18cm x 18cm x 18cm x 15cm.   The dimensions result from the size of the quilter’s equilateral triangle I used to cut the shapes out of template plastic, it being a workable size for what I was planning.  The previous couple of previous posts give some insight into my construction process.

rainbow blog

Of course, cutting plastic shapes leaves scraps, some of them odd shaped, as in these ones from stencil making.  I don’t throw such things out in a place where I’d be lucky to find any of this particular material in a shop here.  Only yesterday was thinking that all these pieces are surely useful for something.

stencils 1 blog

It’s marvellous how the brain keeps turning things over while you’re asleep.  This morning around 4am I was woken by a bunch of party goers out in the street, who eventually got in a car and drove away.   Bless them – it took ages to get back to sleep; but in that time I had several brain waves, beginning with how useful these could be in making elements for use in the little collage pieces I have been doing small collatge 1 blogsmall collatge 2 blog

and presenting on little 20cm x 20cm canvas stretchers.   For example, they could provide a base over which threads could be wrapped to provide a warp for needlewoven elements as in this 1987 creation “Behind The Scenes 2”, which back then were mounted over cardboard.

Behind the Scenes 2

And further, elements could be placed with a spacer behind so it appears to float a little above the rest of the collage.  I was so excited this kept me awake for at least another hour.

Tetrahedrons, Continued…

Tuesday, March 8th, 2016

This one is almost ready to sew up and I  thought I’d document a couple of steps with pics –

inside a tetrahedron blog

1) Showing the back/inside of the structure, where knots anchor the thread as it goes to the front.

black stitching blog

2)  Three of the triangles sewn together to provide the one working surface.

black and white ready to sew up blog

3)  When the stitching is finished, the final side seam is closed and the base sewn on.

I have done several now, and am enjoying making them.  In the next group I will do surface design before covering the template pieces, to see how that goes – probably some combination of paint and stitch – ideas for which are coming far faster than my ability to make them!  I may have some thinner batting somewhere and may replace batting with a couple of layers of cotton fabric – I learn something or tweak a detail on each one, but this is probably the last how-to on them, though  I have no idea where this 3D quilted textile art will go from here.


3D Covered Objects -Tetrahedrons

Tuesday, February 23rd, 2016

Yesterday I began covering enough equilateral triangles to make 4 tetrahedrons, and I just finished #16 this afternoon. As I tidied the work area gathering up the threads and snippets, I heaped the triangles into a neat pile,  and it struck me how much these cream triangles looked like sandwiches or cut bread!  So I set them on a plate for a pic or two – Tetrahedron sandwiches 2 blog

Starting from the lower RH corner, the next pic shows template plastic with cream fabric machine sewn to one side and trimmed;  heat activated batting triangles glued to triangular shapes of cream fabric; and finally the edges hand sewn in place all round a triangle shape.

Tetrahedrons sandwiches blog

So if you want to try them yourself, you have all the knowledge you need, except to practice slip stitching the edges together in such a way that very little stitching shows – use matching thread+skill.  OR one could make the stitching up each join part of the surface decoration.

No Education Is Wasted – 3D Fabric Covered Objects

Monday, February 22nd, 2016

I’ve been thinking about what a lovely shape a tetrahedron is, and how it could be great covered in fabric on which was surface decoration to make a 3D textile work.  Last week the penny dropped on how I could make one with rigid flat sides that didn’t have to be stuffed (and therefore lose the straight shape, perhaps) .  

You know, it is true that no education is wasted, and my memory is long.  In a weekend workshop in Kalgoorlie 35 years ago, taught by the late Rusty Walkley I learned the basics of how to make fabric covered boxes, though I myself only made the one – it wasn’t my thing, but I did finish it, and still have it.  She showed us how to work out the required panel pieces for each side, base and lid of our basic cubic 5″ box.  We measured out cardboard shapes and scored along fold lines before covering and lining each individual piece with fabric, all stitched by hand of course, none of this modern hot glue thing.  When all pieces were covered they were sewn edge to edge to form the 3D piece.    I looked on You Tube and there found tutorials on how to cover existing boxes, but nothing on how to make one from scratch, and as for tetrahedrons covered in fabric, I was clearly totally on my own!  

So anyway I adapted what I remembered from Rusty’s class, and instead of cardboard cut my triangles from template plastic.  I had some thin heat activated adhesive batting which of course did not stick to the template plastic, so I affixed it to the back of the outer fabric before folding those edges over to the inside and stitching into place.  After covering the 4 panels in black fabric, I sewed three together to form the cone which I then decorated with a simple couched design before finally attaching the base:

Black green 2 blog

Black green small detail blog

But next I want to decorate each panel before I sew them up,  as it will certainly be a bit easier to apply the stitchery or whatever paint and other mixed media I decide on, and I hope to make them much more texturally interesting – maybe requiring just a little stitch or dab here and there to carry things over the seam onto the next panel, we’ll see.

For this first effort, I found the big time component is getting each shape covered.  Slip stitching along paired edges to assemble the 3D shape, though a bit fiddly, doesn’t really take long, and applying the 4th side, the base, was less difficult than I expected.  So that’s what I’m up to this week, and I am well along covering enough shapes for 4 tetrahedrons… something I can do with one eye on the telly or sitting out on the shady terrace – it’s not too unlike hexagon patchwork! 

Entries (RSS) and Comments (RSS).

All images and text are © Alison Schwabe
Reproduction of any kind is expressly prohibited without written consent.

Translate »